By Lindsey R. Peterson, Ph.D.
Humanities departments in post-secondary educational institutions are rapidly recognizing the value of developing computational skills among humanists and many are even adopting digital humanities curriculums. Computing education in secondary education, however, is rarely informed by the humanities and vice versa, and many students are never exposed to any computing. Text encoding documents from digital scholarly editions, like the Civil War & Reconstruction Governors of Mississippi project, offer educators one promising interdisciplinary approach for providing students with an early introduction to computing and information management in highly approachable ways. After all, students have been encoding phonics since elementary school. By continuing to teach encoding at the middle and high school levels, they can explore how digital information is created and arranged in libraries, archives, and the internet. Adopting basic encoding into your classroom even presents an opportunity to practice close reading, research, and critically reflect on the limitations inherent to documentary evidence and digital information. And while this task may seem daunting, adopting it earlier in the classroom will help students develop foundational skills in the humanities and STEM fields in interdisciplinary ways that will prepare them for continuing education and offer early exposure to career development. And I promise, it is far less daunting than you think.
What is TEI?
TEI (or the Text Encoding Initiative) is an international organization founded in 1987 to create guidelines or rules for how to mark up a text in the humanities and social sciences so that it is machine readable. TEI is a form of encoding commonly used by librarians, museum specialists, publishers, and scholars that allows users to mark parts of a text so computers can read them, and that information can then be incorporated into coding so that computers can present the information in purposeful ways. Therefore, encoding does things like mark titles as headings, names as people, cities as places, and so on. Importantly, it also provides a framework for analytical reading as you can add contextual details, notes, and draw connections between portions of a text or out to other materials. Encoding offers much more than this, but for classroom purposes, it can introduce students to some of the fundamental computing principles found within encoding languages like TEI and even languages like HTML.1 So, let’s explore a few effective ways you can incorporate encoding into your curriculum.
Teaching Encoding in the Classroom in Three Simple Steps:
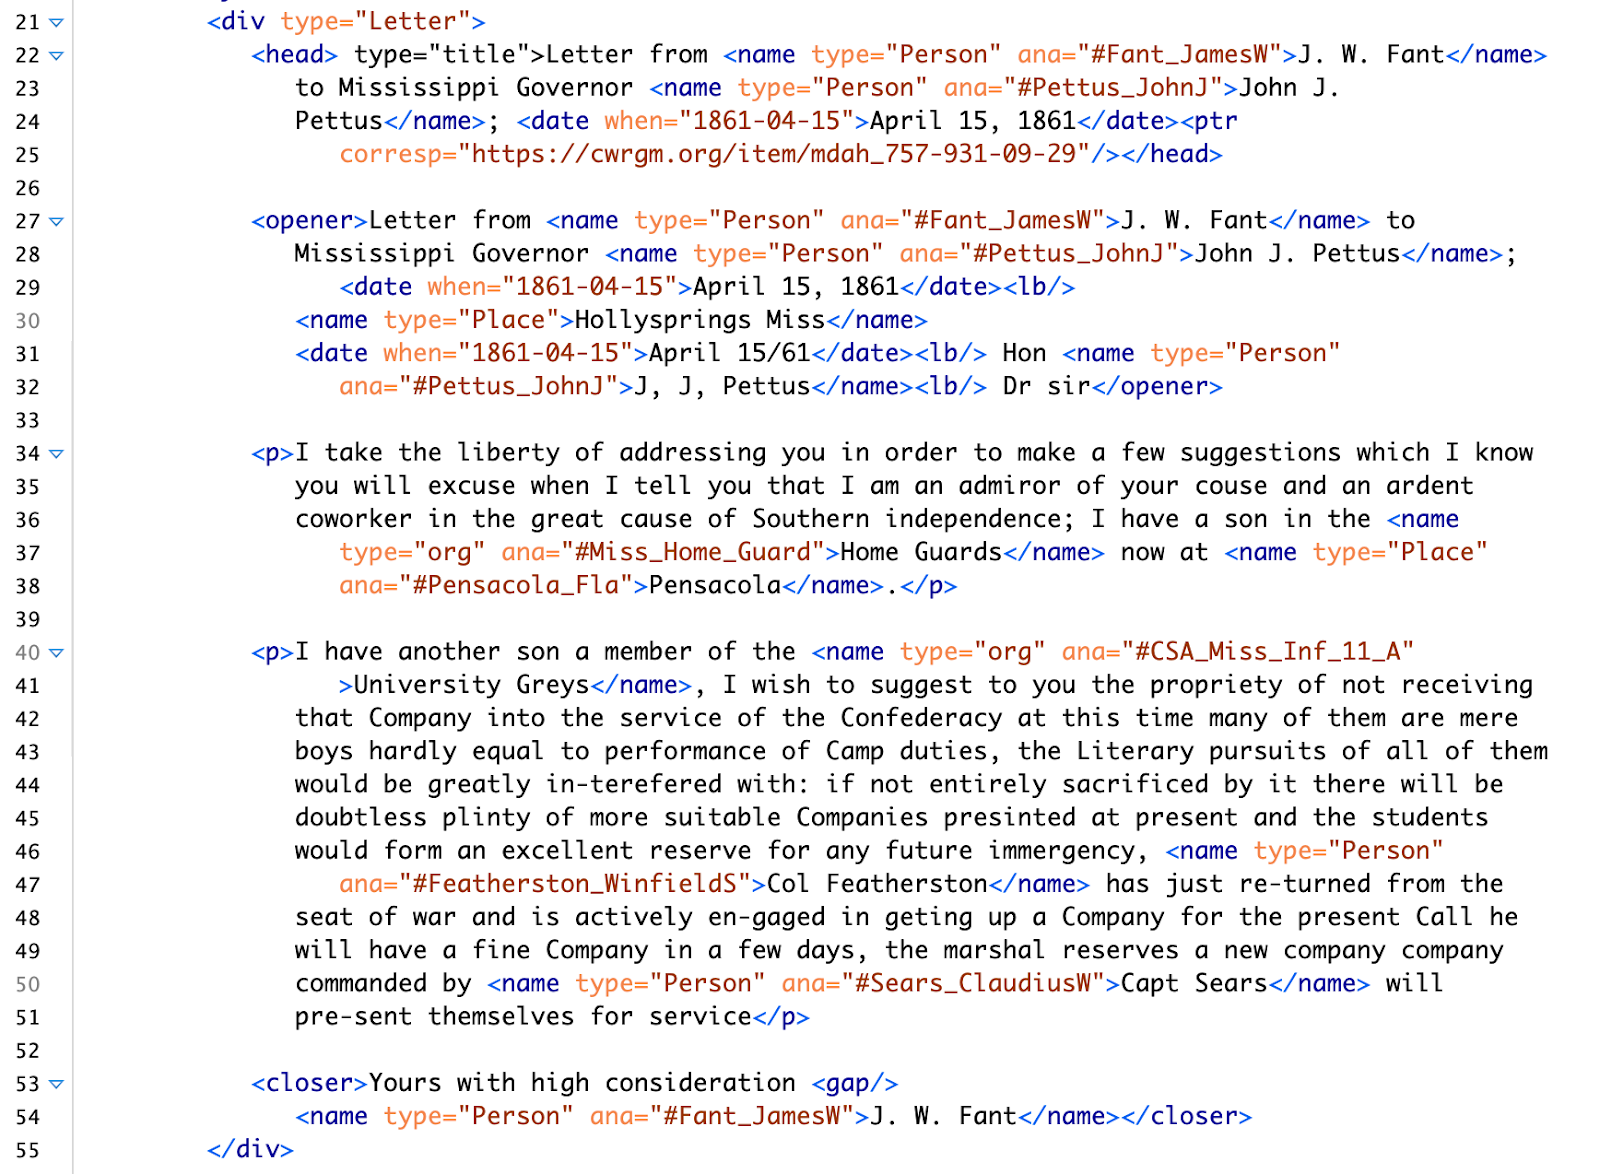
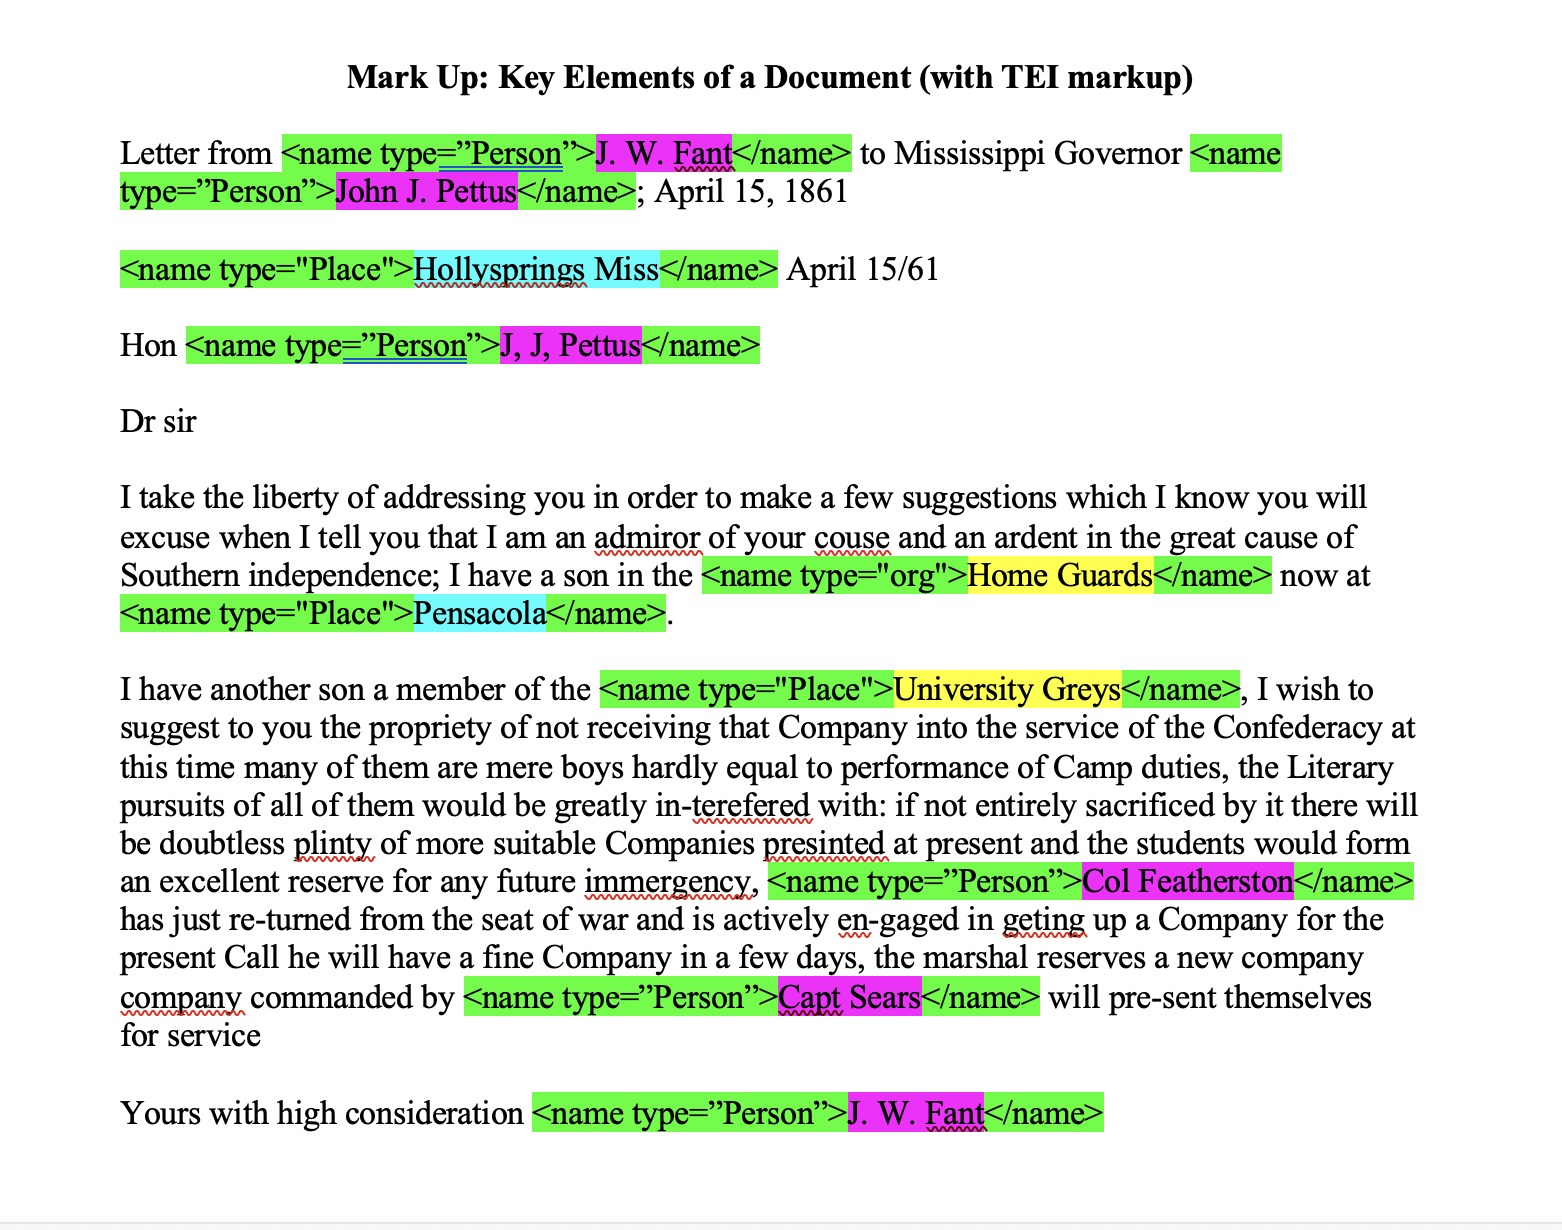
While the TEI markup shown above in Figure 1 may feel overwhelming, it is a fairly simple markup of a letter from James W. Fant to Mississippi Governors John J. Pettus on April 15, 1861 from CWRGM.2 TEI offers nearly 600 ways to identify elements of this letter, but narrowing down to a few that match your learning objectives will be necessary. In this example, I have noted that the document is a letter, the title of the letter, the opening and closing, line breaks, and paragraphs. Having students identify these elements encourages them to think through the unique purposes and forms documents can take, and would be a useful feature in an English course (briefly explored below). I have also identified several key terms belonging to three categories: the names of four people (J. W. Fant, J. J. Pettus, Featherston, and Sear), two locations (Holly Springs, Miss. and Pensacola, Fla.), and two military units (the Mississippi Home Guard and the University Greys). To teach students to encode in your classroom, you can divide the fundamentals of encoding into three parts: using perspective to explore a document, encoding the key terms, and discussing and customizing their encoding work.
Step One: Use Perspective to Explore a Document:
Every document offers numerous focal points, and these should correspond to your course subject (such as government, history, English, geography, and so forth) and the lessons you would like to impart. Introduce students to encoding by having them think through several different possibilities for how to use a letter based on a perspective and purpose, and make sure at least one of these possibilities is explicitly tied to a career path in your subject matter. One way to accomplish this is to divide students into groups and assign them a profession and task connected to the document. Ask them to identify which parts of the text they would find interesting or important from that perspective.
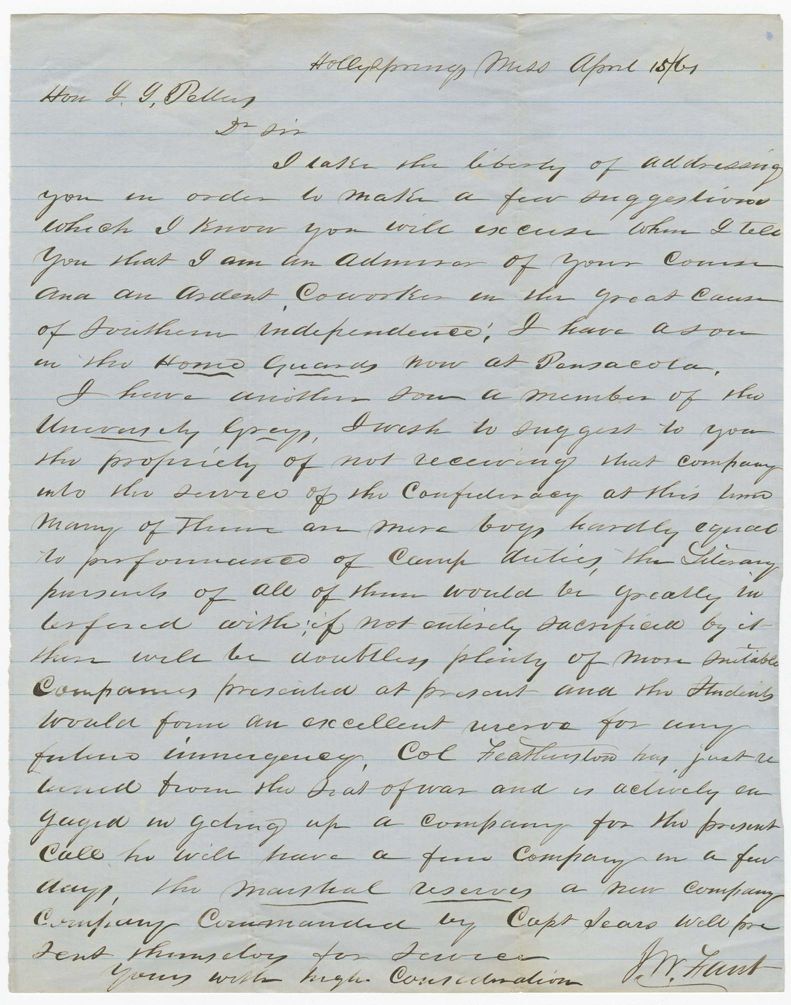
Throughout this article, I will use the “Letter from J. W. Fant to Mississippi Governor John J. Pettus; April 15, 1861” found at CWRGM because it is a short, concise letter that can connect to multiple subjects, and most importantly, it is about students (albeit college students), which your class may find more relatable. Importantly, CWRGM also offers transcriptions of their collection, so students can access it regardless of their ability to read cursive. When using the Fant Letter you could assign students the following fictional roles:
- You are a geographer working for the Mississippi Geography Association tasked with studying how place and region shaped Mississippi’s military units after secession in early 1861. Students here will likely identify Holly Springs, Mississippi and Pensacola, Florida as important, and they may even connect them to the military units.
- The U.S. military has enlisted your team to study who fought from Mississippi in 1861 so they can better understand what motivates soldiers to enlist in the early stages of a conflict. Students will likely identify the Home Guard and University Greys as key terms, and they may also connect this to age or a fear that young men were not prepared for the fighting to come.
- The American Biography Association has hired you as biographer, and you need to collect information on key Mississippians during the American Civil War and summarize their contributions and connections to the war. Here, students will likely mark the people’s names as important, and they may even connect them to the governor’s office, the university, and the military units.
There are many roles and purposes instructors can create; perhaps you could also devise a team of historians, a task force from the University of Mississippi, or from the state governors’ office, and so on. By taking on a role, students will practice locating relevant evidence and purposefully connect it to a professional setting. They will also be learning the first steps of encoding and editorial work by identifying what is important for markup and making the connection that these choices will depend on their unique purposes.
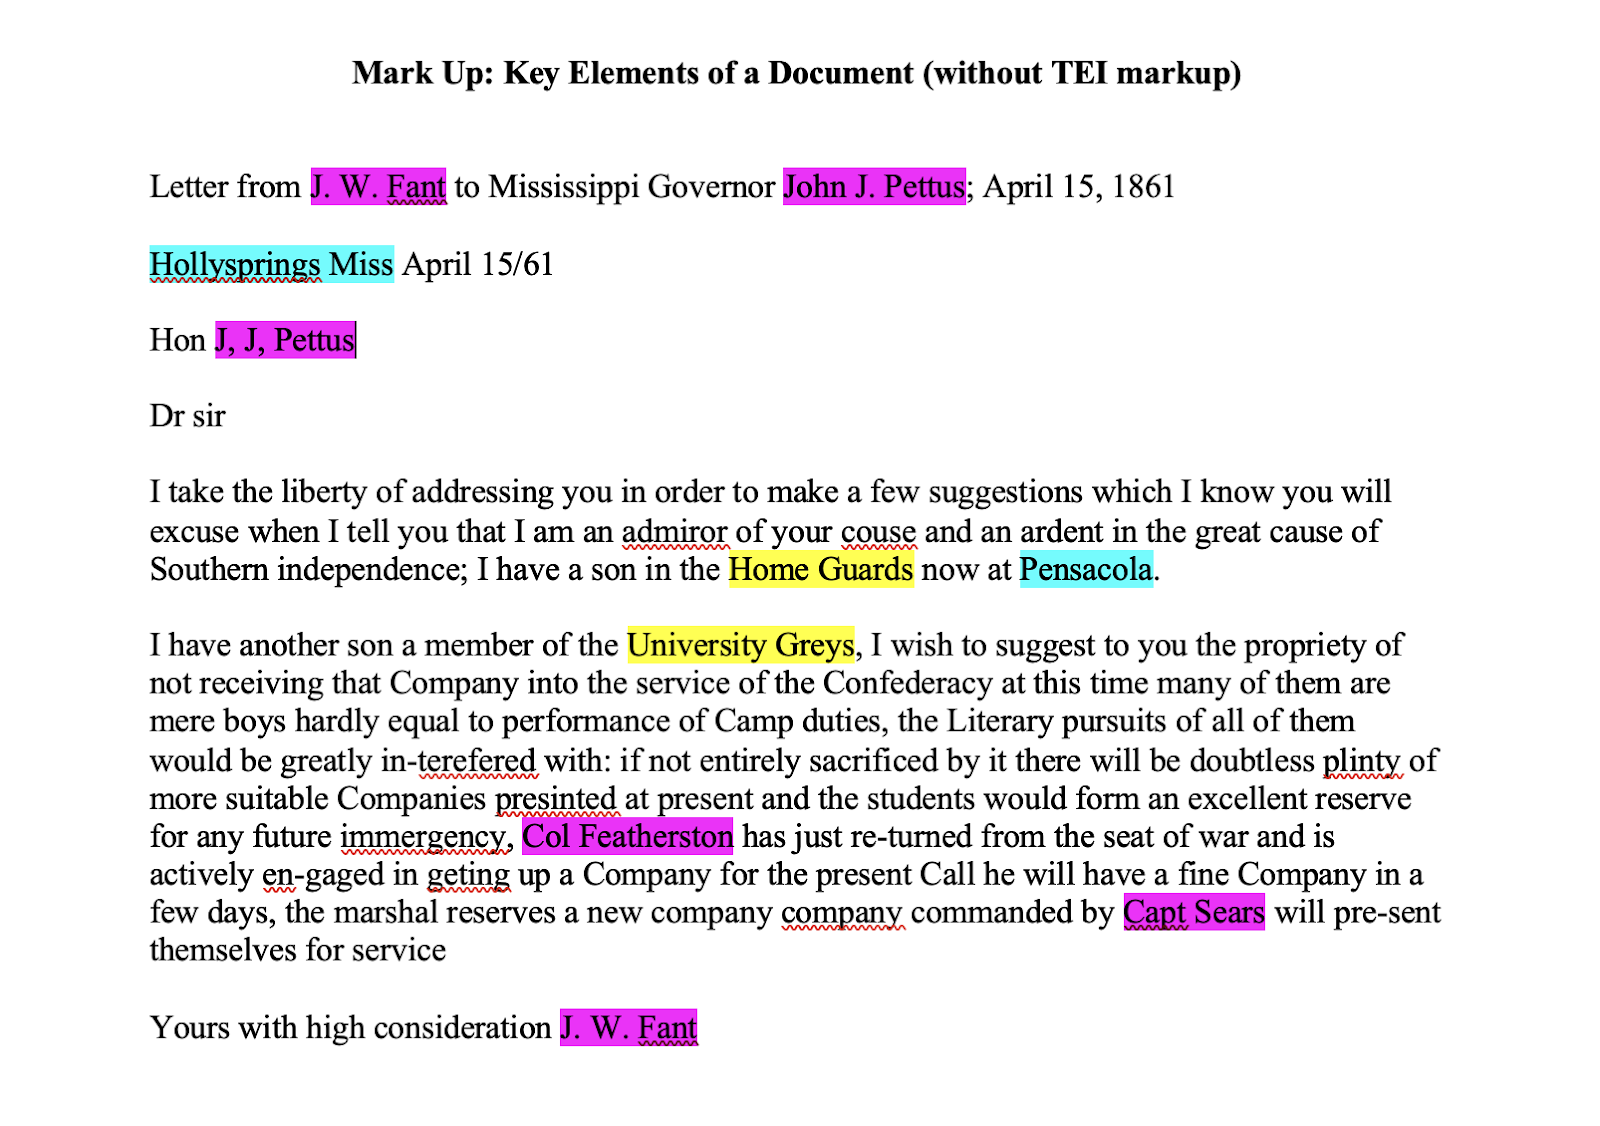
Once students have been assigned to their teams, have them begin practicing markup the document itself by highlighting, underlining, or drawing boxes around the terms they deem important to their purpose (see Figure 2). This task can be customized to the technologies and supplies in your classroom and budget. For example, you can project the text onto a white board, display it on a smart board, use word processors, or this can even be accomplished with printed copies. In modeling this for the students, I suggest using three to four different colors to group the key terms together. For example, the Fant letter features the names of people (in pink), places (in blue), and military units (in yellow). Depending on your students’ skill levels, you could provide the categories for them or ask them to create their own. Once they have highlighted their terms, come together as a class to discuss; here are some questions to guide your discussion:
- Why did you pick these terms? Why are they important to your purpose?
- How did you group them together and why? What is included when you group them this way? What is excluded? (Note: when they identify key terms, they will always emphasize one thing in favor of another. In this example, we are highlighting people, but key identities like “students” are not being deemphasized. However, if this was an important aspect of your work, they could choose to encode “students”; this is an editorial choice).
- How complete is the information they highlighted? For example, were they given the person’s full name? (Note: Some names, like military commanders and politicians (ex. John J. Pettus) are more likely to have full names with accompanying web pages. With ordinary people this is less likely, and if the person is a woman (ex. Mrs. Robert Jones), enslaved (ex. John), or a person of color (ex. J. L. Jacobs), information will be more scant).
Step Two: Encode the Key Terms:
I promised this was easier than it appears, and while it may seem too simple to be of value, by marking key terms and grouping them, students are practicing some of the first steps of encoding and editing. They are making choices about what information is relevant and how it can be organized for a variety of purposes. The next step is to introduce your class to some of the introductory rules and methods of TEI markup. Don’t let the encoding marks fool you, this is also a manageable process.
Begin with a brief discussion asking students whether they think highlighting these terms means computers can read them or identify them. Essentially, the answer is no. Identifying a term is the first step, but for a computer to do anything with it, students will need to encode it. A word processor or any analog method will work, so long as you have space to write around the key terms that they have selected. To encode a document so computers can read it, students will need to learn a few simple rules and methods:
- For the computer to recognize that these terms are important, they will need to add “elements” to them. We will work with the <name> element, but as I mentioned previously, there are nearly 600 options. I have also marked all of the elements in green, and will continue to mark the people in pink, places in blue, and military units in yellow.
- Place the element term, in this case “name” in angle brackets, so the computer knows to distinguish between their markup and the original text. Opening elements will look like this: <name> and closed elements will look like this: </name>.
- Elements must be balanced. If they add the opening element before a key term and do not close it, the computer will treat the rest of the document as a name. To close an element, they will need to add a closing element at the end of their term.
- Incorrect: “I have another son a member of the <name>University Greys, I wish to suggest to you the propriety of not receiving that Company into the service of the Confederacy….” (Note: in this example, the computer will treat the University Greys as a name, but it will also think everything following “Greys,” is part of the name).
- Correct: “I have another son a member of the <name>University Greys</name>, I wish to suggest to you the propriety of not receiving that Company into the service of the Confederacy….” (Note: To fix it, close the element with a backslash; this will tell the computer that only the term “University Greys” is part of the named entity).
- They can also add “types” to the
element: In our example, we have groups of named people, places, and organizations (in this case military units), and you can use encoding to classify the names into their own sub-groupings. To do so, add a “space” and the classification “type=” after the word “name” in your opening element and add the category in quotation marks: “People,” “Place,” and “org.” See these examples: - <name type=”Person”>J, J, Pettus</name>
- <name type=”Place”>Hollysprings Miss</name>
- <name type=”org”>University Greys</name>
I recommend first modeling this for students using another document or even the same, depending on their skill and comfort level.
Now that students have identified the key people, places, and military units, they can practice marking up the text with these elements (see Figure 3). Remember, that adding the markup based on TEI is essentially letting the computer read the highlighting or underlining they already completed. There are a variety of ways to tackle this task depending on your classroom’s need, but a combination of independent, group, and class work will likely work best to help develop students’ comfort level with encoding:
- You may choose to have students work as a group or individually to markup one category (persons, places, or orgs), and/or work as a group or individually to mark up all three category types. Students can add elements using a word processor or use colored utensils to markup a paper copy of the letter.
- Using dry erase markers on a document projected on a white board or a document visible on a smart board, work together to show the markup students or groups created. Have students individually come up to the board to markup one term at a time.
- If the class is more introductory or struggling with encoding, you may even break this into two steps by first adding only the <name> and </name> brackets in round one and then come back to add the “ type=”place”” values in a second round.
As students practice encoding, here are a few common errors to watch for:
- Missing angle brackets: “<name”
- Brackets facing the wrong direction: “>name<”
- Missing the opening or closing element: “<name>Text” or “Text</name>”
- Missing the backslash in the closing element: “<name>Text<name>”
- Forgetting the space or equal sign after the element type: “<nameType=”place”>” or “<name Type ”place”>”
- Forgetting the quotation marks around the type category: “<name Type=place>”
Additionally, here are a few questions to guide your discussion about these elements:
- Why might you want to put these terms into categories like people, places, and orgs instead of just placing them into the name element category alone?
- What are other possible categories they might create for a document?
- What are some possible challenges to creating categories? (Note: They may discuss that not all terms easily fit into a category. For example, nicknames may or may not be included in the name group. Or should they include forests in the places group or only towns; what about states or counties? These are editorial choices they are making based on their purpose).
Step Three: Discuss and Customize:
Now that students have practiced marking up the documents, it is important to highlight what the markup does computationally and use it to practice deep reading.
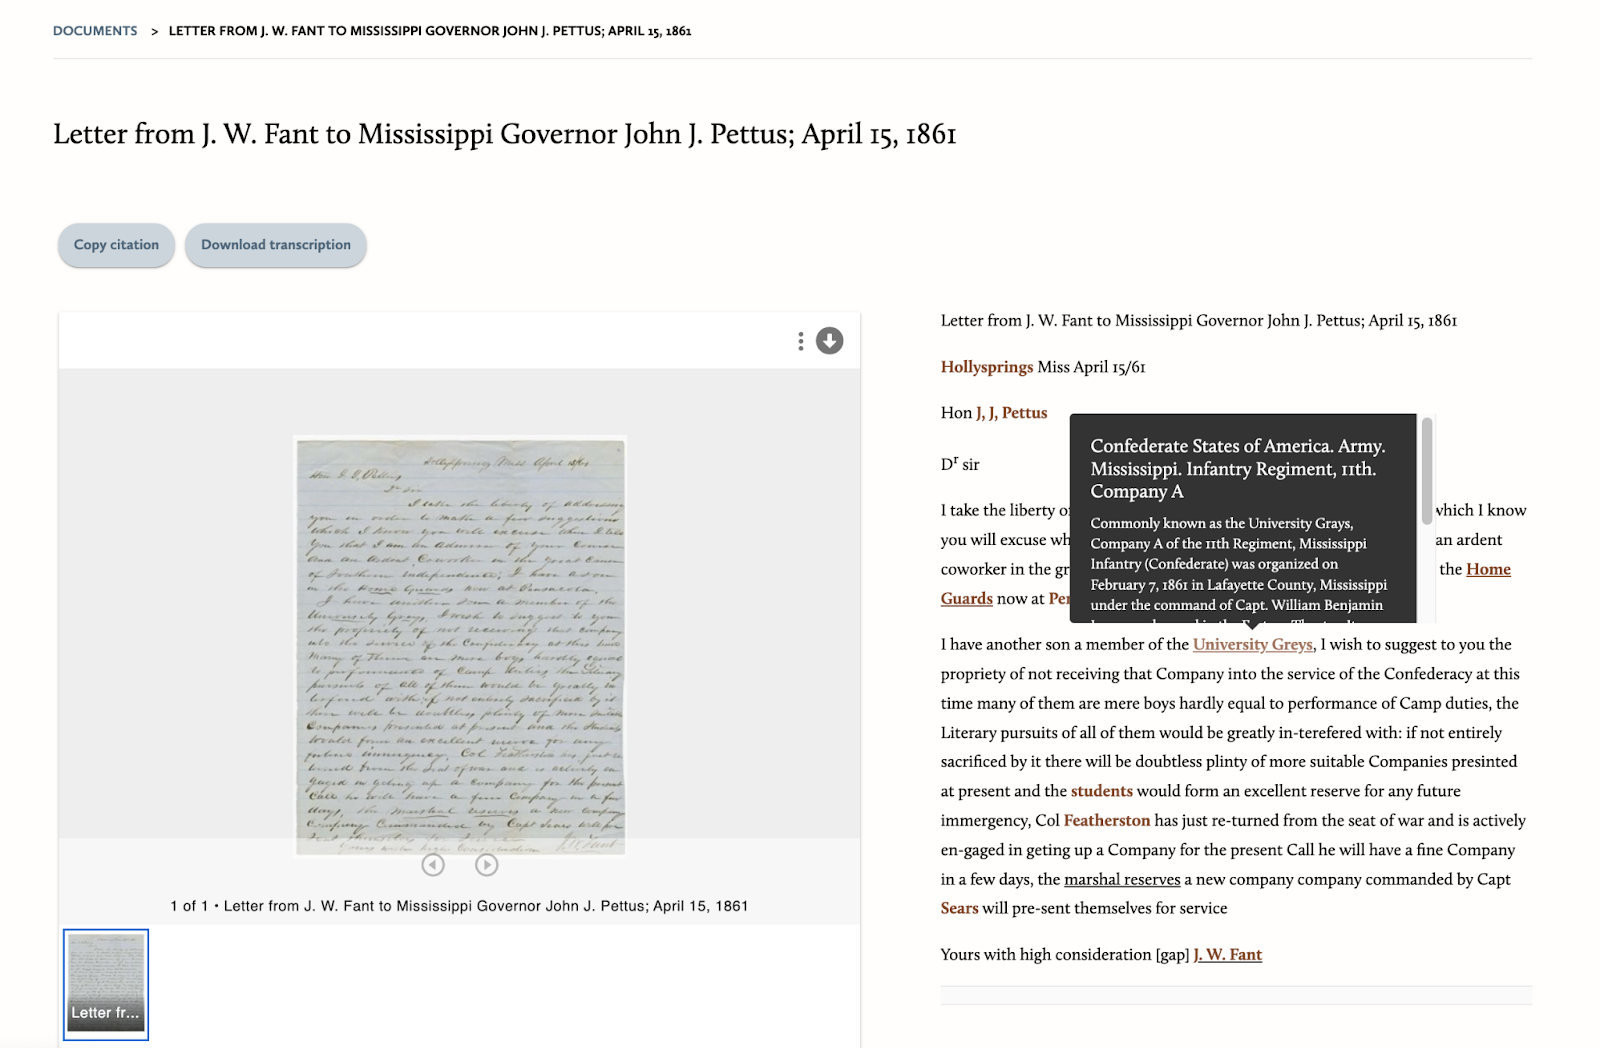
What can the markup do and why does this matter? The short answer, at least in computing, is that it doesn’t immediately do anything. However, adding these elements and element types, allows computer developers to write code that can perform a variety of things with the text that has been encoded. For instance, you could return all of the people found in a document or a collection of documents, which would be very useful for your team of fictional biographers. With further encoding, you can also add contextualizing annotations to the terms in the document, or link together all of the documents that included the University Greys military unit. These possibilities seem abstract, but fortunately, you can use CWRGM to demonstrate encoding’s possible outcomes. Pull up the Fant letter at CWRGM to demonstrate:
- If you select the first instance of “Hollysprings,” for example, you can access over 200 documents also containing the town. (Note: you may want to discuss that features like these make it easier to find information about people like Fant or others who are hard to locate on the internet).
- If you hover over or click the term “University Grays” in the letter, you can view an annotation that provides additional information about the unit, and then the annotation is populated into every document that includes the unit. (Note: This is an excellent opportunity to discuss why it is useful to add annotations to historical documents, such as helping present-day users understand this time period, offering more appropriate terminology, and adding additional information users may need to understand the concepts of the letter, among other benefits).
I have already mentioned several ways to scale this assignment down, so let’s explore some other ways to expand this lesson to encourage a deeper reading. Now that they have encoded the letter, they can practice research and annotation.
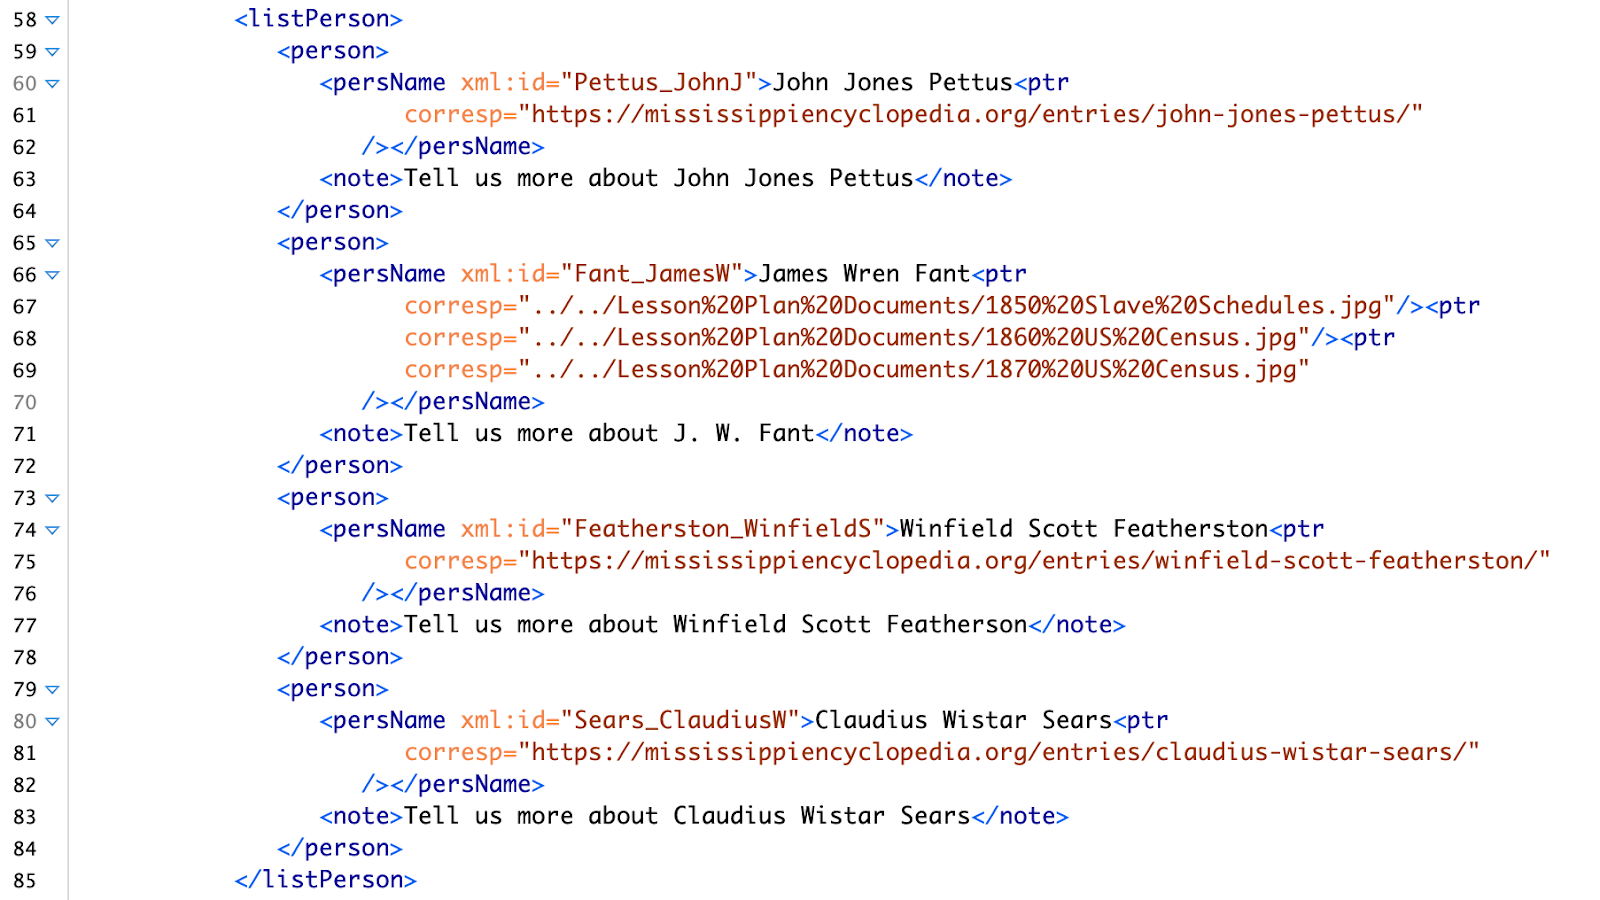
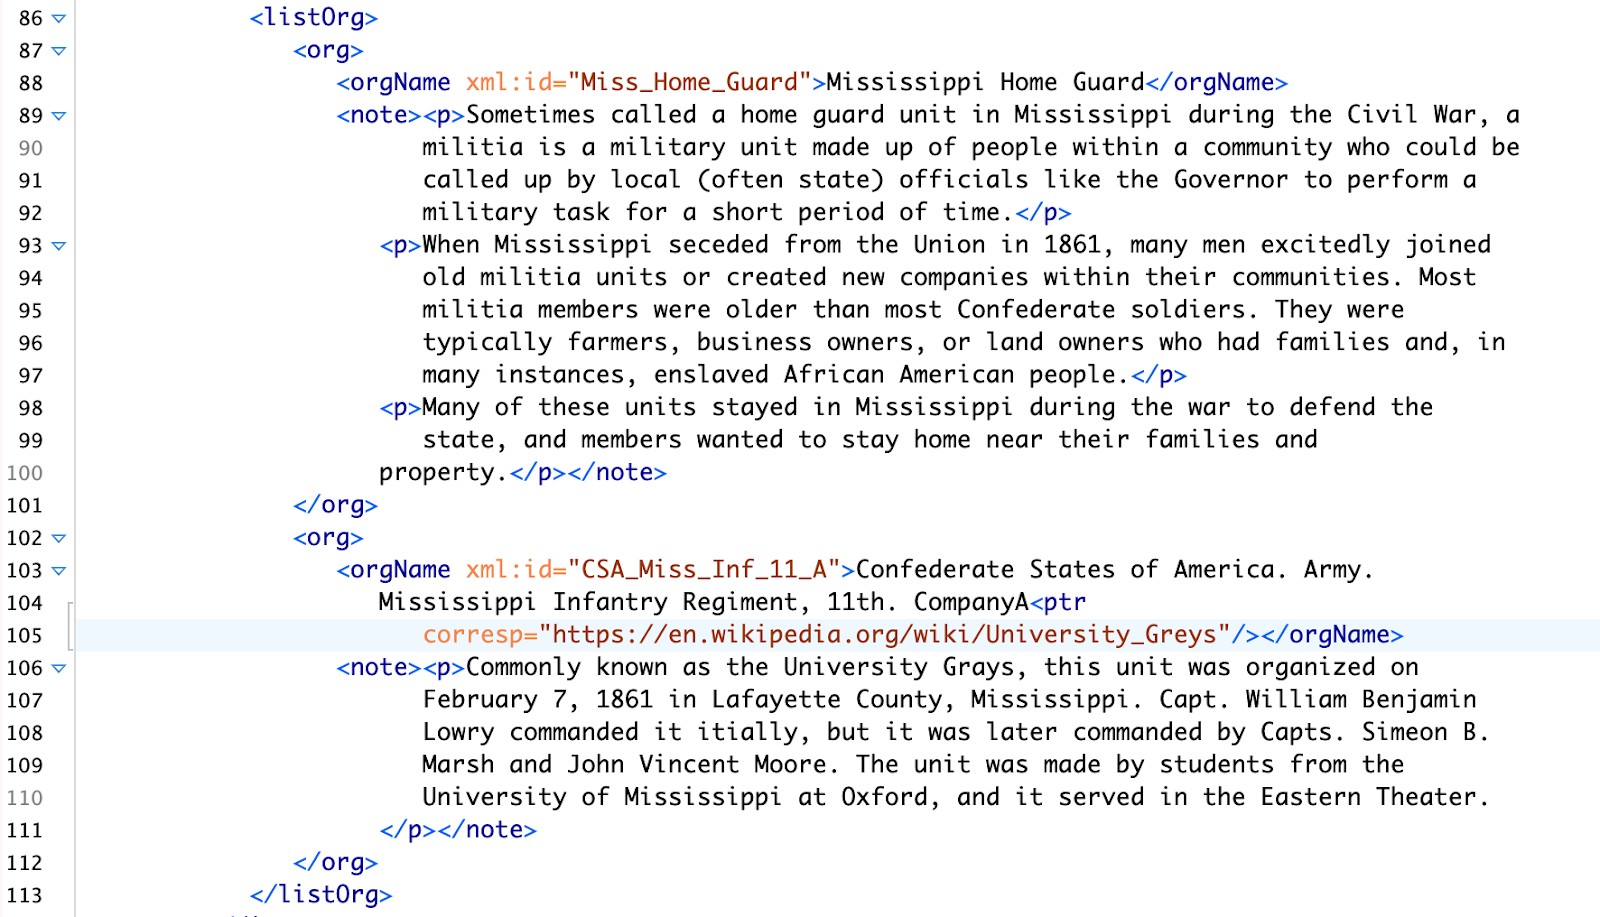
If you or your students are curious about what the TEI encoding can look like when annotations and hyperlinks are added to their key elements (like they are at CWRGM), here are screen captures (see Figures 4–5) of some minimal TEI that I added to the bottom of the TEI in our earlier example (see Figure 1). The encoding shown here connects web pages and historical documents to each of the four people in the letter (see Figure 4) and adds basic information to the two military units (org) (see Figure 5).
Students can also practice a stripped down version of this in the classroom. Working from their assigned teams (geographers, historians, etc.) they can research and write annotations for the key terms they encoded. To simplify matters, here are a few web resources from Mississippi Encyclopedia on Governor John J. Pettus, Colonel Winfield Scott Featherston, and Captain Claudius Wistar Sears. J. W. Fant is more difficult to locate online, so here are links to his entries in the 1850 Slave Schedules, 1860 U.S. Census, and 1870 U.S. Census. (Note: the wealth of information of these military and political leaders and the lack of information about Fant and/or differences between tertiary, secondary, and primary sources are great discussion topics here; and learning how to read the primary sources for Fant, would also be a worthy discussion or assignment). Don’t forget, CWRGM even includes brief annotations on the Mississippi Home Guard and University Grays, and Wikipedia also hosts a page.
Researching and annotating these key terms is one way to expand this exercise for a more in depth analysis, but there are several others:
- Encode, research, and annotate other documents from CWRGM. You could explore the collection by keyword searching or browsing by document or topic. Students can then draw connections between documents.
- You could also apply this exercise to other resources.
- Identify new categories and terms to encode in your document(s); these can also be researched and annotated.
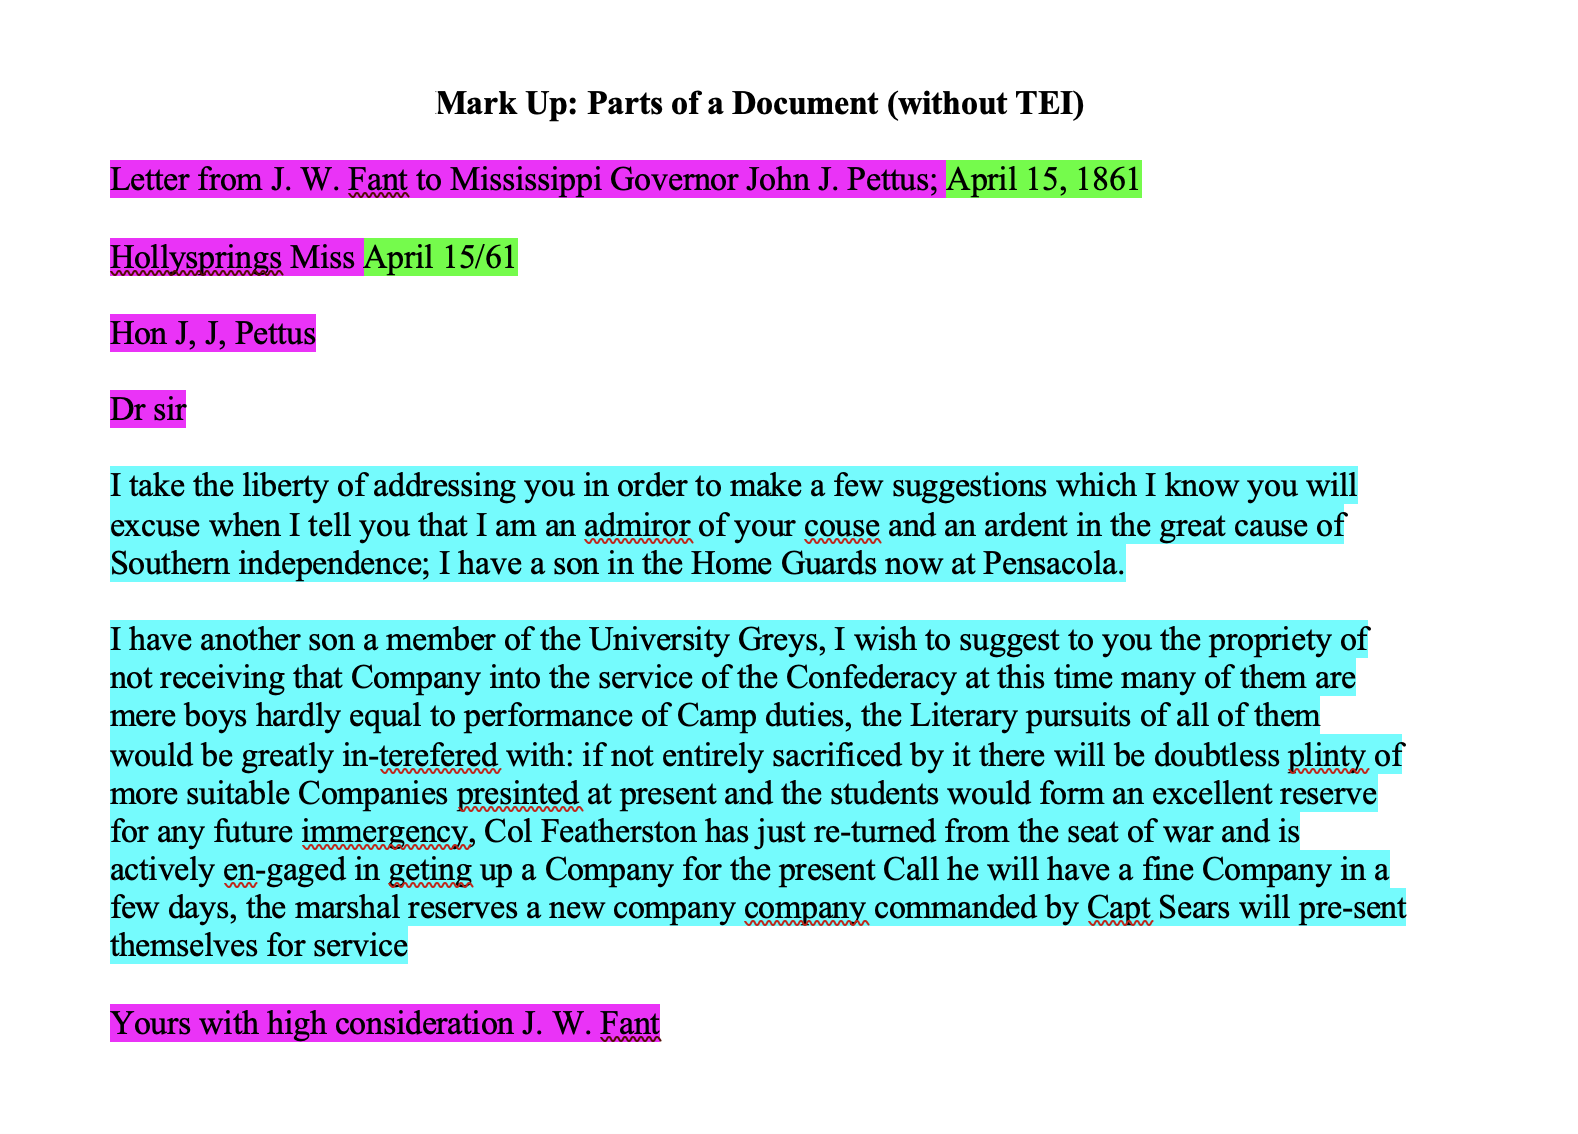
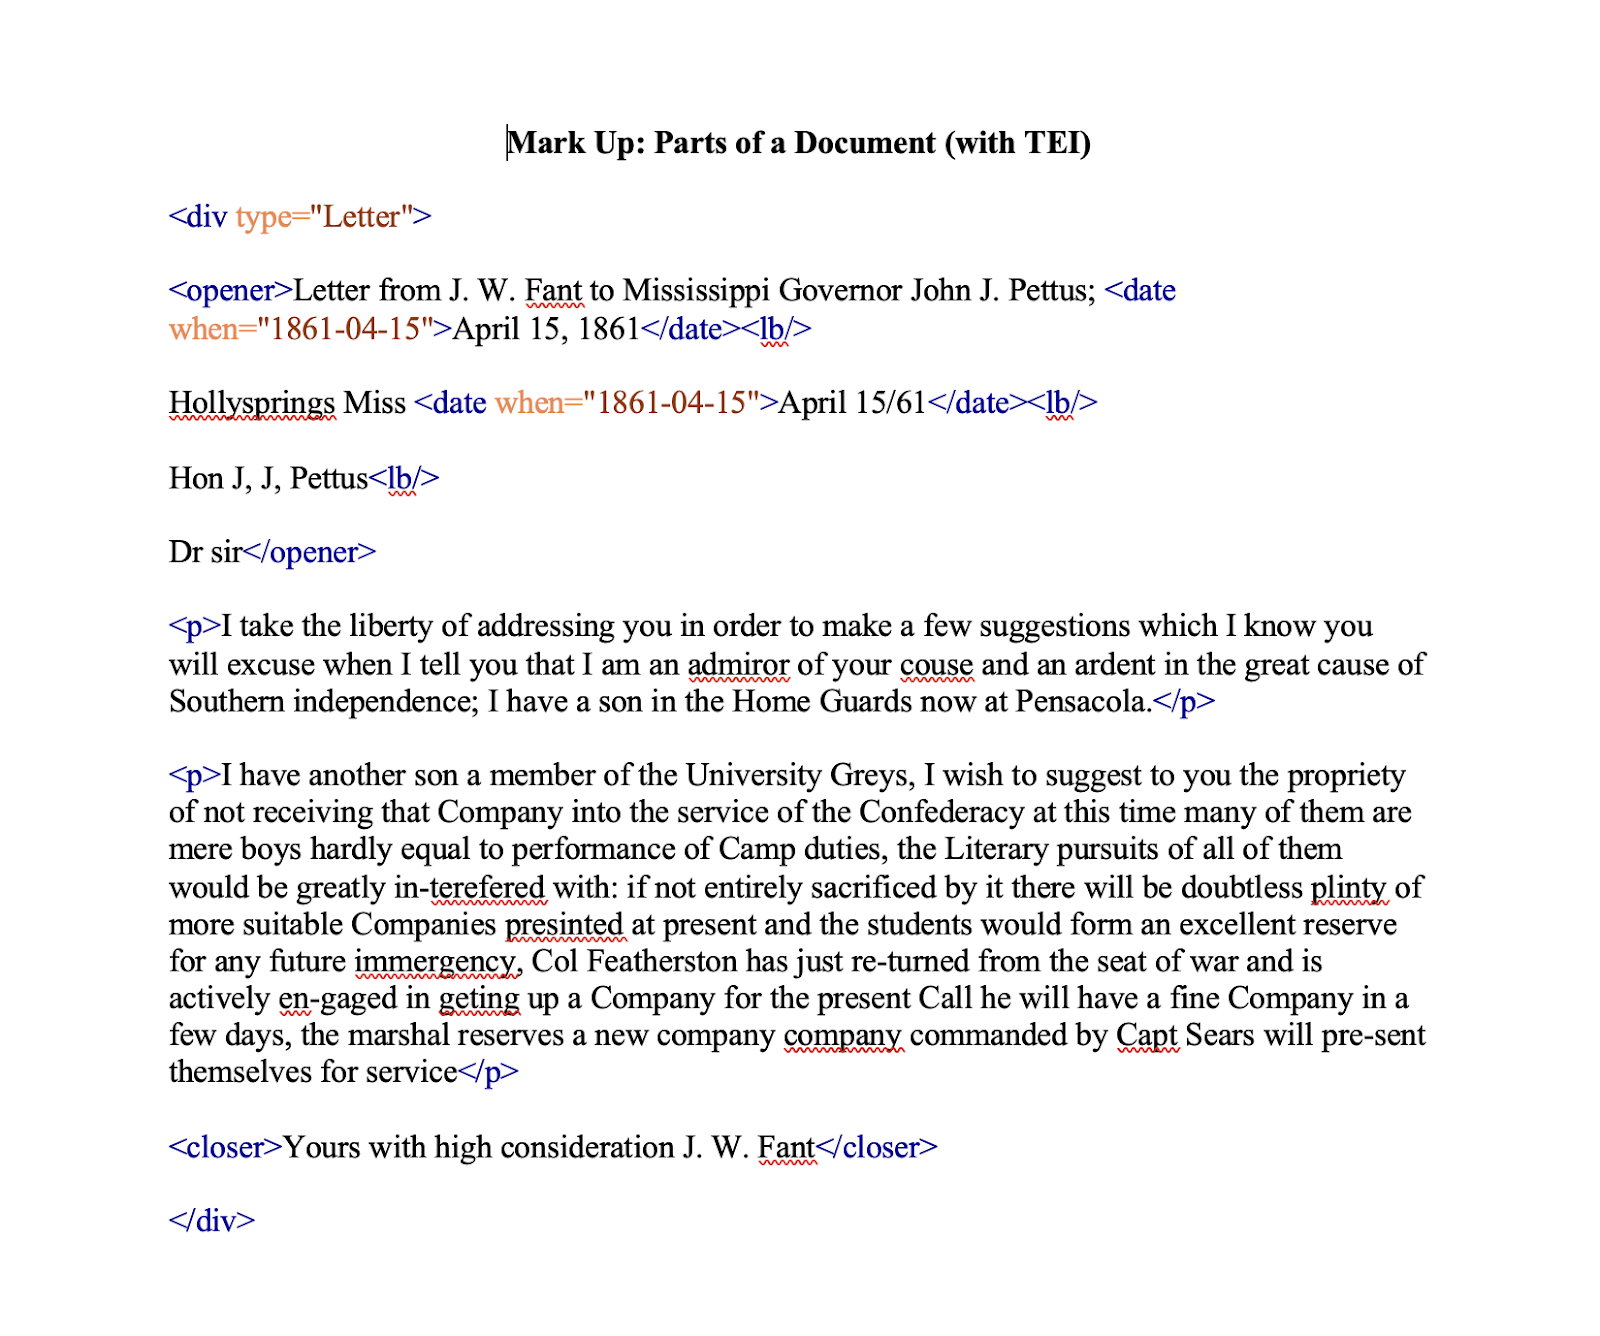
- Especially for English courses, students can mark up the parts of a document (see Figures 6–7) or sentence structure and reflect on the purpose of letters or other forms of documents in general, how people communicate, and continue the discussion of how people talk to computers. Here are two examples of what this markup could look like (see Figures 6–7) rendered in a way that follows a similar method to the one explored above (see Figures 2–3). This example identifies the document as a letter and highlights its opening and closing salutation and date.
This encoding assignment, especially when expanded to include a research and annotation component, gives students an opportunity to work with a text on a more in depth level, and apply it to a humanities context. In this instance, their encoding of the Fant letter could end in a discussion of U.S. history and the American Civil War era. Here are some questions to guide your discussion:
- What can we learn about Fant by reading this letter? How does your research about Fant in the Slave Schedules and censuses inform what you know about his world view? (What are Slave Schedules?).
- What is the purpose of Fant’s letter? Why might he oppose the University Greys being received by the governor? (Note: Consider how he uses age to reinforce his argument).
- Soldier Motivation (Mississippians in the Confederate Army):
- Why might the students at the University of Mississippi want to form a unit together? Why might they want to enlist and fight?
- Why might Fant’s other son want to join the Home Guard? Why might Fant support this when he opposed his other son’s enlistment with the University Greys? (Consider how close to home militia units were in comparison to Confederate units).
- What are Fant’s sons’ names? (Note: the letter does not say which sons specifically, but many of his sons’ names are listed in the census; most students will not make this connection, but it is a great opportunity to discuss the limitations of sources and some methods for overcoming them (such as using the censuses)). Where could you look to find information about them?
- Does Fant support the Union or the Confederacy? How can you tell? Why might he choose to support the Confederacy when many Mississippians were Unionists as well? (Why Mississippians supported secession) (Consider his role as a slaveholder, for example) (Note: students could research Fant in newspapers at Chronicling America).
- Whose perspective is represented here? Is this perspective absolute? Whose perspectives are missing? (For example, we do not hear from his sons, wife, or the people he enslaved; we do not receive the governor’s response either).
These are just a few of the rich possibilities you can develop to help students take their encoding, research, and annotation and combine it with some humanist reasoning so they explore the motivations and experiences of some Mississippians during the American Civil War.
Encoding with TEI seems like a daunting task, but hopefully these step-by-step examples will inspire you to incorporate it into your classroom. Encoding helps students process the fundamentals of written communication in documentary and digital formats, and provides them with an early introduction to some of the elements computers need to read human produced information. Additionally, it creates an analytical framework for deep reading by emphasizing context, drawing connections between resources, centering research and explanation, and helping students think through what information is present and what is missing. Considering all of these benefits, now is an excellent chance for many of us to move past our fears of the digital, and adopt some early digital humanities into the classroom.
Lindsey R. Peterson, Ph.D. is the Digital Humanities Librarian/Assistant Professor of Practice at the University of South Dakota (Vermillion) and co-director of CWRGM. You can learn more about her work at lindseyraepeterson.com. Thanks to funding from the National Historical Publications & Records Commission, she attended the 2024 Digital Humanities Summer Institute (DHSI) where she completed the Text Encoding Fundamentals and Their Application course, which inspired this post.
References:
- See David J. Birnbaum, “What is XML and Why Should Humanists Care? An Even Gentler Introduction to XML,” Digital Humanities, accessed June 6, 2024, http://dh.obdurodon.org/what-is-xml.xhtml#:~:text=XML%20is%20a%20hierarchical%20tree.&text=It%20may%20look%20like%20a,nest%20fully%20inside%20other%20elements. ↩︎
- Fant, J. W., “Letter from J. W. Fant to Mississippi Governor John J. Pettus; April 15, 1861,” Mississippi Department of Archives and History, Pettus Series 757: Box 931, Folder 9 in Civil War & Reconstruction Governors of Mississippi, accessed June 6, 2024, https://cwrgm.org/item/mdah_757-931-09-29. ↩︎